I don't do a lot of multiples of the same design. That's intentional on my part for a number of reasons but when it comes right down to it the big two are:
A: I want the person I'm making the mat for to know its a one off. Theirs is the the only one in existence anywhere and even if I was to do another design featuring the same set of ideas or characters I would come up with a different image. I realize it's possible this isn't that big a deal consciously to many people but it is important to me and looking at it this way helps make sure I always try and come up with new designs whatever the subject.
B: Since I'm making these by hand no two are going to be exactly alike anyway, my hand might travel just that tiny bit further, a colour that was mixed perfectly for one might be a shade lighter on the next, or I might have picked up a bunch of new skills or leveled up since I did the original and they may influence how the second version looks (that may actuality be the topic for another upcoming article) If someone wanted twenty of the same mat for example they would definitely be better off with me providing a digital design that could be printed. I mean if someone did want that many mats hand drawn I'm not going to say no, I like a challenge after all, but it might take a while.
So we have established that one off's are in general the rule but like everything in life from time to time rules are meant to be broken, or at least circumnavigated, in this particular instance the brief was to create three mats for members of the 'Without A Doubt Gaming' Guild/Group.
Everything in the design would be the same.
Except the names.
Hey look now the mats aren't identical! Joking aside the design we eventually settled on is quite involved for something I have to draw mostly the same three times, in part 3 I'll talk a bit about how i went about keeping them as similar as possible but first we need to step back a few stages and talk a bit about how we got to this design in the first place.
Part 2: A +2 Bonus to Engineering.
One of the best things about computers is that you can iterate a design and make corrections or changes very quickly. Tweak a colour here, scale a selection there add filters and lighting effects like there's no tomorrow.
Ok you have to be a bit careful with thoes last two or you can end up with a right mess but heck I once wrote a program whose sole purpose in life was to iterate and create variations, its a computers strength is what I'm saying.
Anyway to the left you can see a collection of variations on the design. The initial brief called for two copy's of a blue logo with yellow text and the players names underneath but just to be on the safe side, and because I'm not the biggest fan of mirroring, I provided this set of designs to be reviewed.
I had a feeling the fourth one down would get picked, you start to get an intuition about these things after a while, its either that or certain sketches universally resonate with people above and beyond all the other choices they are presented with.
The version of the design locked in there was only one thing to do before starting to work in the physical world. go back to yellow text, since it makes the design easier to read and stands out more and then start wishing I hadn't come up with something so very digital looking.
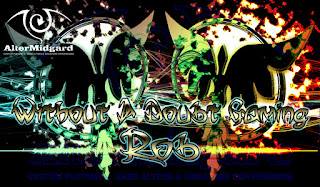 Ok that's two things but take a look at a larger digital version of the final design here on the right. I have to take something created by firing photons towards your eyes with its tiny curvy lines and large amounts of text and make that to look as close to the same as possible on canvas using a medium that gets darker the more you add and has a number of limiters on how small you can go, there's a reason most people hand drawing mats avoid doing text.
And I've got to make three of them.
Like I said I like a challenge.
Part 3: Build Macros to Save Time on Repetitive Actions.
The first thing to do is get the design down on the mats themselves this will usually involve pencils. You could use anything that will mark the material but keep in mind for this design we are looking for precision.
Ok that's two things but take a look at a larger digital version of the final design here on the right. I have to take something created by firing photons towards your eyes with its tiny curvy lines and large amounts of text and make that to look as close to the same as possible on canvas using a medium that gets darker the more you add and has a number of limiters on how small you can go, there's a reason most people hand drawing mats avoid doing text.
And I've got to make three of them.
Like I said I like a challenge.
Part 3: Build Macros to Save Time on Repetitive Actions.
The first thing to do is get the design down on the mats themselves this will usually involve pencils. You could use anything that will mark the material but keep in mind for this design we are looking for precision.
It's best to get all the details that stay the same between mats down first and then draw in whats different. We don't want things changing scale or position just because our eyes are thrown off by the placement of an 'o' on one mat that isn't there on another. We also do them all at once before starting coloring because the best way to keep them similar is to take it steady and do each stage on each mat before moving onto the next thing, We don't want to suddenly find we are out of black because we have finished one mat and the other other two are three stages behind for example.
It also helped that I marked out a grid on both the design and the mats beforehand and to make even more sure the names have placement marks built into their design that will be covered by colour.
 I mentioned photons earlier. Digitally it doesn't really matter which way around I work, especially with vectors, but in real life if I were to lay all the black down first I would have a hard time getting back to the lighter ones.
Which is a bit of a shame since its the colour that covers the greatest area and if i got that out the way early things would certainly take less time. Instead I stared with a pale yellow, like I often do, and blocked in the bright areas move to the next mat repeat and ditto for the last, an added benefit is that if there are any deviations between the pencil lines, say some aren't as easy to see as on another mat, you tend to find yourself using what you know from mat 1 to inform how you colour number 2 and that combined knowledge helps with 3.
Then you move up through the yellows and the oranges, the greens and light blues and you find that along the way there's a rhythm to the colouring that plays repeats, repeats, then begins again. the images begins to tighten up, you add the reds and dark blues with little fuss because you know where everything goes now and then finally you have to add the black.
I mentioned photons earlier. Digitally it doesn't really matter which way around I work, especially with vectors, but in real life if I were to lay all the black down first I would have a hard time getting back to the lighter ones.
Which is a bit of a shame since its the colour that covers the greatest area and if i got that out the way early things would certainly take less time. Instead I stared with a pale yellow, like I often do, and blocked in the bright areas move to the next mat repeat and ditto for the last, an added benefit is that if there are any deviations between the pencil lines, say some aren't as easy to see as on another mat, you tend to find yourself using what you know from mat 1 to inform how you colour number 2 and that combined knowledge helps with 3.
Then you move up through the yellows and the oranges, the greens and light blues and you find that along the way there's a rhythm to the colouring that plays repeats, repeats, then begins again. the images begins to tighten up, you add the reds and dark blues with little fuss because you know where everything goes now and then finally you have to add the black.
At which point the game changes and now I'm playing match the light area with the corresponding dark space. It wasn't even something I had considered while designing just one of the pitfalls of using filter effects you could say because when it came time to add the black I suddenly realized that every light area had edges that butted up against a dark one.
What could have been a simple fill in the blanks now turned into a practical tutorial on how light works I would add black, check the original image, make sure the edges lined up, add some more black, push the edges to meet where they didn't, refine lines where I needed extra sharp definition, and make sure I remembered what I had done on one mat to repeat it on the next.
Finaly I add the curvy lines in and these I do use a lighter colour to go over the black with because while it requires more brute force it gives a finer line.
Part 4: Server Down for Maintenance.
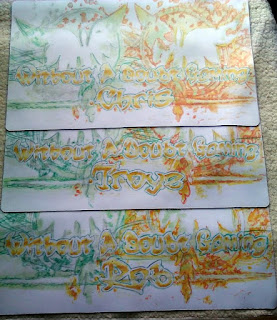
Admittedly not the clearest of images, since finding space to lay out all three next to each other and having a high enough resolution is tricky, this should still hopefully show how close the three final mats are to one another. That being said each does have its own personality and quirks just by virtue of the order I was creating them in and becuase they are hand drawn.
Since I did each step on the same mat first every time it became the most spontaneous, one of the other two has more red and blue mixed with the black its slight but adds a minimal temperature variance, the third obviously benefits from the things i learned from doing the other two. There are no doubt countless other little things like that which make each mostly the same but still very individual.
So yeah sometimes breaking the rules leads you down new paths, it certainly seems to have improved my concept of light and dark with has been handy subsequently.
That's just about all I've got space for today, until next time try and make the mass produced unique.
 Some projects have you fired up and ready to go as soon as you hear their details, the flip side however is that sometimes you can find yourself lost on how to move things forward. In todays post I'm going to cover mental blocks or a lack of desire to create and then cover some ways in which you might overcome them.
Part 1: The Problem.
Two designs came in at almost the same time. The difference was that while I had a pretty good idea of how I was going to go about doing one the second just eluded me. As I worked on the first I mulled the problem over, why was it that I was putting off starting the second? What was it about the brief thats was leaving me cold?
There are any number of reasons why you might feel apathetic towards a project but as the first design drew to a close it became more and more obvious that the reason I wasn’t overly eager to start on the next was because I had absolutely no idea of what it should look like.
Drawing a blank so to speak.
Nada.
Zip.
Thats sorta an issue when your whole deal is drawing stuff. If it helps imagine it being in the same vein as writes block theres a blank sheet of paper staring up at you and you have to fill it with words or in this case an image but it just stays blank, a reflection of the lack of concepts in your mind.
We have to be professional about this though, theres no option not to do it, isn’t one of my sayings that I can and will draw anything? Just starting into the void isn’t going to get us anywhere its time to take the fight in other directions.
Part 2: Working Around the Block.
1. If we cant get over the problem its time for a flanking manoeuvre and in the case of drawing stuff that means, well just draw a load of stuff. It doesn’t matter so much about what your drawing as long as you start, although its probably useful if you start drawling things related to the topic your focussing on.
2. Do more research, find cool stuff on the internet or in books. We tend to limit ourselves to small islands of the internet, perhaps its time to follow a few links and wade out into new territory, let inspiring things you find and see refill your creative tanks.
3. Doing a large amount of anything can wear you down. perhaps you need to take a break. Or change mediums for a bit, assuming you don’t have writers block perhaps you should do some creative writing.
So lets see has any of that helped do I know what I'm going to do yet?
Nope.
Dang it.
Part 3: Resolution.
In the end the solution hit me like a mortar while I wasn’t even looking for it. Which in many ways makes the previous section seem less than helpful, still I was doing something else entirely or rather sitting outside not really doing much of anything when it hit me so lets count that as number 3 and press on.
Part 4: The Hook.
That was it then, out of the blue I had the hook I needed to hang the whole thing on and we were off and motoring the brain flips back to 'extremely interested in working on this' mode and the mental block or whatever it was is routed.
Telling a story is just as important in images as it is through words, one of the big reasons I couldn’t decide where the design was going was because I couldn’t see the story. Why are the characters doing what they are doing how does that influence the composition, the poses or the choice background? I didn’t know, which creates concern or worry, in extreme cases you could stop being able to create at all having become so consumed by fear of the blank page.
Sitting there not really thinking about anything I finally realised what the hook was. These characters whole thing is the fact they are dressing up as other monsters the Yugioh worlds equivalent of cosplayers but what about the original creatures their costumes were based on what did they think of this? Where were they?
Well it could be that this is monster hunter and...
no no too depressing this needs to be a celebration of sorts lets go completely the other way how about super deformed mini versions of the creatures the characters costumes are based on?
Because theres nothing that screams insane anime excess quite like merchandising.
Or something, look I didn’t say the hook had to make sense it may not even be what the final designs story is about but having those five extra characters to work with opened up a wealth of design possibility’s and pushed the tone of the piece more towards a sense of fun.
From there all the research and sketching comes back into play and I realise I would quite like to make almost a logo out of the design, you know like one of those games with all the guys holding pointy weapons out of the design and various angles. Thats the second hook then and the block is well and truly obliterated. In the final part we will quickly cover the actual design process.
Part 5: Add Obligatory Spiral.
 We are covering a lot of ground now its been a bumpy ride but the goal is in sight. Mostly because we have finished the sketch and its been approved so now we go into redraw and refine mode.
Flip the image, fix errors improve lines and the use of space, no pesky thinking about concepts to worry about here.
Transfer back to digital cut up, rearrange, flip push liquify and scale. Nope just good old fashioned learnt techniques.
Draw one final time and then again on the mat itself and then its on to the colouring.
I'll going to be keeping the background simple for this one, theres quite a lot going on already so best not to distract from the foreground to much. If you squint theres a hint that the overall composition forms the shape of the factions mirror logo thing but its subtle and I gradually made it less of a thing as I made revisions.
We are also going to add a white outline to all the figures because thats something else thats a pretty traditional Yugioh styling choice. That said the characters themselves are going to lean towards the more realistic side of lighting, thats more a byproduct of where I currently am at with my art.
And we are done the victory is ours we have overcome the void won the day.
Until next time keep moving forward, sideways, or backwards if you have to, inspiration will hit you eventually.
Just not across roads, thats not inspiration, those are cars.


 Ok that's two things but take a look at a larger digital version of the final design here on the right. I have to take something created by firing photons towards your eyes with its tiny curvy lines and large amounts of text and make that to look as close to the same as possible on canvas using a medium that gets darker the more you add and has a number of limiters on how small you can go, there's a reason most people hand drawing mats avoid doing text.
 I mentioned photons earlier. Digitally it doesn't really matter which way around I work, especially with vectors, but in real life if I were to lay all the black down first I would have a hard time getting back to the lighter ones.

