Showing posts with label Refresh. Show all posts

29 August 2016

Refreshing a Custom Playmat: Persona 3 Nyx Mat


Chances to upgrade a piece of art don’t come along that often. After all by the time anyone gets around to even thinking about it your probably several hundred years dead. On the other hand Playmats are art that has to withstand the rigors of constant use, occasionally they may require a bit of a spruce up. Thats going to be the topic of today's post as we take a look at what was 
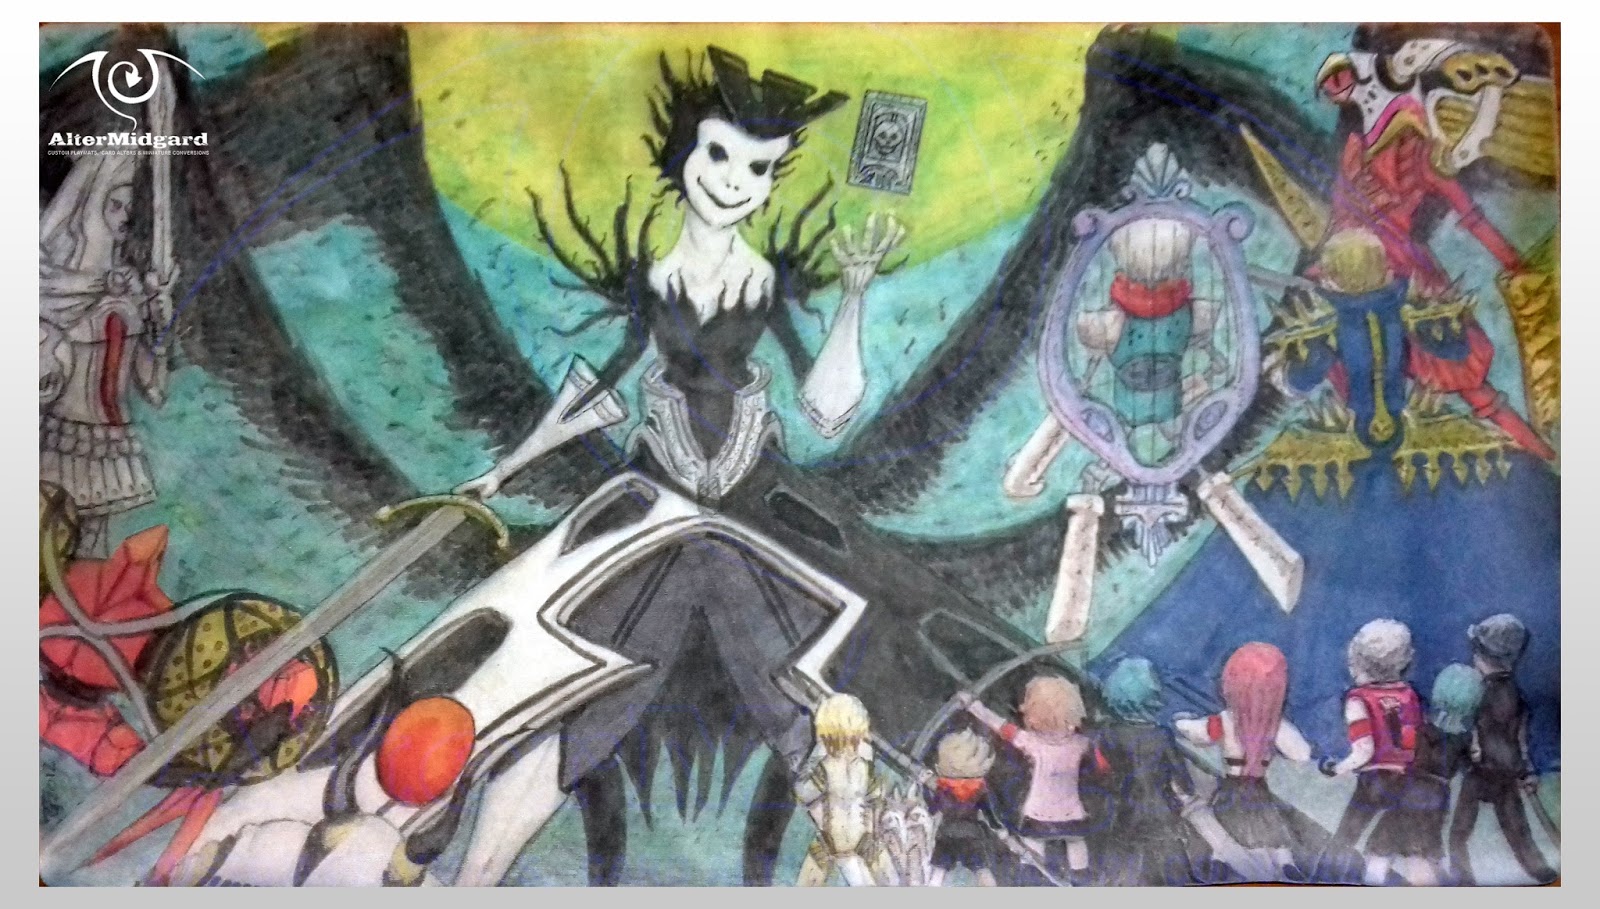
involved in refreshing the Persona 3 Nyx mat..

Four years in the breaking

It's been a while Persona 3 Nyx mat, how've ya been? Bearing in mind I had no idea about sealing mats at the time I think it's done well for 4 years of use. What we are seeing is that the colours have faded slightly and there is understandable wear around the edges, both from use and living loose in a bag.

A tiny bit the worse for wear but overal you've done well soldier

It's the black thats faded the most. Which is interesting since usually its the paler colours that are the first to go, must have been something to do with the fact I was using two different mediums. That aside the most striking change is the loss of that vibrant neon.

Here's a little secret though. This image, the contrast has been pushed up to make the blacks darker and the image easier to read, the original was never quite this dark in the first place. Why push the contrast so much? Well you see at the time I didn’t exactly have all that decent a camera and it helps to offset the low resolution. That said with this refresh I'm hoping to get the mat up to this level of colour at the very least. Think of it as finally matching the original vision. First though we need to know why the mat looks as it does not after four years.

Why do things fade? Well there are two main reasons.

Reason one: Wear.

Want to see what a mat looks like without its backing? Any mat thats is, even the printed type? Heres a pic.

Best not to ask why I have the fabric of a mat and not the rubber under-layer. There was an experiment...

Yup its essentially just a bit of fabric, not a particularity thick piece of fabric either and yet one that has to withstand all the card flicks, elbows, greasy fingers, and rubbing from other objects in a bag that occur during a mat's life. It would be like if you only had one tshirt, You wear it wash it then put it on again, over and over for four years. What happens to any images on it or the seams and edges?

Thats right Wear, Luckily unlike clothes the rubber backing of a mat keeps it from falling apart we still have to deal with wear to the image though.

Reason rwo: light.

The sun is trying to kill the colours.

Over time light breaks down the pigments, less tiny pigment particles less colour on the human eyes scale. This is more like a river carrying away the individual particles ,with less of them left behind its impossible to be as bright as before the river appeared.

On the plus side unless you leave your mat on a windowsill while your not using it light is less of an issue. Also gaming stores aren’t renowned for their sunroofs.

On this mat what we are seeing is mainly a wear issue. I can feel the fabric isn’t as thick as it used to be and there are more frayed fibres around the edges. One of the things we will be looking to do near the end of the process is to bulk the mat back up a bit.

Beyond that it's a straight re-colour.

Well it would be but I've come a long way in four years, I think we can do better than that.

The reunification.

In this image I'm about halfway done with the refresh.

There are a number of things that still need fixing.

You can already see things have begun to tighten up. If I was to draw a graph showing level of detail over time there would definitely be an upward trend, I guess thats what you get with practice.

I've been removing as many Tangents as I could find, we've covered this before but to recap. Tangents are where lines meet and form shapes they shouldn’t and in doing so they confuse the viewers eye. In this image for example the way the bow, spear, and Nyx's dress interact caused some confusion originally, at least I wasn’t happy with it at least. Theres still a bit to do to work them apart but you can see the beginnings of the refinement of each object and my atempt to move them apart..

Another thing we can do to improve readability is make sure that dark edges are followed by light areas and vice versa. There are a lot of very small details on this mat, for example the gold spikes, and we can increase the crispness of their edges without putting a black line around them if we use this technique. I've also changed the lighting, on the original I use a grey to shape the black clothes of the characters but if the moon is the primary light source then doing so leads to confusion, where is the light coming from to make their backs lighter than their sides? Just fixing this makes the figures feel much more a part of the rest of the image.

Finally I've begun darkening the edges of the image in order to create an oval of darker colour. This pool into witch we are drawn should help to keep the viewers eyes within the bounds of the image where before with all the figures at the edges it could be quite easy for the eye to wander out.

At this point I'm not sure if I want to outline the everything or not.

0.3 to 0.8

I've outlined the everything.

I'm not sure which I prefer this or the top image.

Had to in a way. Ceaser is all grey, at some point near the edge of a surface your going to need to go darker to create the outline and once you've done that then you start thinking 'well lets just see what the guy next to him would look like' and it's all a bit of a snowball from there.

What I didn’t want to do however were boring lines that were all the same width, you know like I did the first time around because I didn’t have four years more experience. So keeping the Rarity mat in mind I set about outlining everything, making sure to vary the pressure of my stroke. To make doubly sure I went back and added even more thickness to certain areas I wanted it to be really obvious. Then I got an even thicker brush and drew big black lines around the characters.

But that was too much so I undid most of it.

I'm glad I did add the line-work in the end, not only does it make those areas that had lines originally more dynamic but it really helps to make the character pop.

I've been talking about techniques to sharpen the image for a bit now so I guess it's past time to mention colour.

Colour me unsurprised.

In the original image the sky is something of a teal, one I no longer have access to. This turns out to be less of a problem than it seems since the moon is green after all and as I boost it back up to its neon glory I'm naturally drawn to blending out from there using greens rather than teals anyway.
I want to bring more of the blue from the dress into the left of the image as the right is a bit heavy with it so start to tint the greys with a blue shadow. Th blue Itself has held up well over the years, theres no real surprise there its what blue does. Still I want to add in some dynamism so work the dress up to a darker shade and blend out to create folds in the fabric

In the same way I want more blue on the left, the areas that were red and orange before are all now shades of one colour to draw your eye from left to right. There's a nice curve there I think it should be used. Equally the yellows are better matched now, I really wanted to cut down a bit on the number of colours involved, less can be more after all and if it helps strengthen the overall image all the better.

I debated weather or not to add purple clouds. It would have had a nice contrast to the green but theres no taking that back, the sky isn’t really the focus anyway so had I not liked it I would have been stuck with at best very dark green clouds.

Just to add to the eeriness factor I've left Nyx's face without shadows, clearly she can self illuminate somehow – perhaps she is a nightlight. I also altered the smile and reshaped the head. It wasn’t that far off before but you should have been able to see more hair on the right and now she looks like she's enjoying herself more.

Deepen the blacks on Nyx. For obvious reasons we do the black last (hint we don’t want to be trying to put yellow over it) lets also sort out the boot on the right not sure what went wrong there but its not the same size as the one one the left even if you cant see most of it. I could go darker with the wings but as we have learned we want things in the background to not be as bright/strong.

Bring in some green shadows and highlights to tie the figures and the sky together and we are done. Not quite the same style as before but possibly closer to the original anime intent overall, especially on the humans.

Next up lets do something to keep this mat going for even longer than four years.

CFC Free.

With the colouring done its tim for detailing.

Not as in adding detail, more the polishing a car up to make it look as good as it can.

Here that involves:

Trimming any glaringly obvious frays: Being fabric we don’t want to go to crazy it might un-knot.

Painting the sides of the edges of the mat: if it's green at the edge we don’t want to see white over the lip.

And adding an undefined number of layers of sealant.

This last point involves a spray so you will want to do this outside in calm dry weather. Here I've gone with a mat sealant, mat as in not gloss rather than specifically for mat's. As I mentioned earlier I want to improve the mat's thickness so it takes a fair few coats to bring it up to where I am happy with it. Adding the sealant helps for three reasons. First it locks in the colours, second it takes the wear before the mat itself and third a decent sealing product will have some form of UV protection or be lightfast in some way.

Basically it helps slow the process of ageing.

For art that is, I advising against any attempts to use it in any other way.

Once this is dry your done and ready to once again take to the battlegrounds.

...

I just wish I had a blacklight, see one of the ways I got the brightness back up was to use glow in UV colours. It woulds be nice to know if the sealing process turned them off or not.

Obviously thats a story for another time, until then remember art isn’t ever a finished thing theres always room for a refresh.

Although I'm not sure how I would feel about someone else messing with my art 100 years form now.

21 August 2015

Moon Princess Vanguard Custom Playmat Refresh

 
Final refresh for a while. I'm going to wrap this series up by taking a look at the moon princess mat.

When I made this mat originally I think what I was aiming for was an anime style flatness, bright colours, sharp shadows and highlights. Looking back at it now and it just feels like it could have done with greater sharpness, as if I didn't quite commit to making certain areas as bold as they probably could have been.


The main focus of this refresh then was going to be increasing the level of detail and sharpening the edges I was going to keep the colours relatively intact.

Then on a whim I decided to add a black shadow to the beads and things took a much darker turn.
 
And so, much like the other mats in this refresh series I ended up focusing on light and shadow. None of which were particularly consistent in the original, especially since there was a large round yellow light source behind her and it was having no effects on the lighting.

So I recoloured it orange.

That didn't look quite right either and I realised that both versions were having a weird effect on the way the figure in front of them stood out. You see the darker areas were fine, they had nice soild edges that worked well against the yellow, but the light areas had a nasty tendency to blend in. The opposite was also true when things transitioned to the black background, it was all a bit frustrating.
 
So I coloured the moon black.
 
That sorted the problems with the light areas (brought them up quite nicely in fact) but still left me with the problem of sorting the feathers on the black background.

At about the same time I decided the main light source would be above the princess (It's probably slightly in front of her too). this way I wouldn't have to mess around too much with the light on her hair and it also meant I would have more solid understanding of where shadows and highlights would need fixing, dont wing it is what I'm saying figure out your lights first.
 
With this all sorted I could get on and finesse the wings, adding a white line to the lower edge and generally chopping them about until they looked a little more like they were all about the same size.

I dyed her hair black which was interesting because then the outlines ended up being a light colour and that's not something that's really happened before and its an interesting effect that I might what to try elsewhere. I straightened the sword because even though the bulge in the original image is due to scanning it still want totally straight, changed the way the shield's mirror works and then realized something was still missing.
 
So I coloured the moon white.
 
Not an especially easy task but luckily the underlying layers still remembered they had originally been yellow, if they had been black to start with it would have been much more difficult.

Final touches were to tighten up all the line-work and the edges  then smooth out the transitions between colours. Somehow I had gone from cartoon shading to gradients almost without realising still I definitely think prefer it this new way especialy the way the princess seems to stand out more.

The last thing I considered was adding card zones, but then I thought 'for which game?' I'ts probably best to leave it as it is and let whoever may eventually want it decide if they want something specific.
 
Next time another moon, just a decidedly less friendly one.


17 August 2015

Lightswprn Playmat Refresh Steps 1 to 5


Originally posted on my Facebook page over the course of a week this post collects all the text and images together into one place. I'm going to leave the text as it was written to maintain the feel of progression.


Monday

This week I'm going to be refreshing the Lightsworn playmat and I thought it would be interesting to show the progression from original image today to however it ends up turning out on Friday. As such each day there will be an image (or images) plus some text about whats going on or perhaps tips and techniques.


Best to start at the beginning though, so here a pic of the mat as it stands now.
There are a number of goals I have for this refresh and they are:

A: Find a way to push the background into the the background: While I like it, if this was a TV show both the foreground and background would be in the same focus which isnt ideal. What we really want is for the characters to be the main focus so we need to drop the background back a bit, either by lowering the detail or making it less sharp.

B: To remove as many tangents a possible: More on that in the days to come
C: Generally increase the level of detail: we might not want to go too crazy but lets see what happens.
That's it for today, assuming I don't mess it up somehow tune in tomorrow for the next stage of the process.


Tuesday

This week I'm refreshing the Lightsworn mat. Tune in every day to see how it's going.

So where are we at?


Well the first thing I did was give the background a light wash of grey. this knocked out some of the green, evened out the colours across the whole background and started to fade the lifework. However I then realized that all the characters are shades of white so a grey background might not get me much closer to completing goal A.

Next up was to try adding a glow around the characters, you may have noticed almost all Yugioh mats use this trick to separate the monsters from the backgrounds so I figured why not give to a go. Orange / Red were basically the only choices with the characters all being blue and white and the glows being green and it definitely makes them stand out but I'm clearly not quite there yet.

For Goal B I've already identified a number of areas that need adjustment (as seen in the red circles). Places were lines intersect causing the viewer to misinterpret what they are seeing or making it more difficult to read. For example the one in the bottom left, is that an ear or just another part of his robe? fixing these areas will help to make the individual monsters... well more individual.

Goal C is more of a gradual process, I've started increasing the shadows and highlights and noticed there are a number of areas that weren't quite finished. Why for example is there a large empty space under Lumina's arm? (It's possibly a crystal like the one below but doesn't really read as that) There were also one of two small areas of background that had detail but no colour , very odd.
Next time, find out what colour the background ends up.


Wednesday

This week I'm refreshing the Lightsworn mat. Tune in every day to see how its going.

Day 3 and its time to talk techniques.


First though you will have noticed the background is suddenly very red. In an effort to have the outlines match the background better I just decided it may as well be. I have used a gradient though and the heaviest layers of red are applied to the outer edges since I want to try and keep the glow in the center. Once again this has softened the linework, too many more layers and I might want to start adding it back but we will see.

What I mainly want to talk about though is how I've been going around adjusting lines the general idea being that if you have one side of an object that's very bumpy using straighter / smoother lines on the opposite side simplifies and makes things cleaner while not impacting the detail too much. In the lower images which show the beginnings of this the red lines represent parts that have been smoothed while the blue lines show... well the opposite. The green line shows were i have started work on smoothing out that side of the arm by strengthening the white highlight that separates the arm from the adjacent character but still have things to do like add the shadow to the adjacent character that should accompany that line.

Which is the other major thing. This time around like the other refresh mats I'm moving away from black lines defining edges and trying to go a bit more realistic. I'm not going to push it too hard on this one since I still want a slight cartoony look but we will see how it goes.
Having separated the characters from the background the next thing to do is spend a bit mote time separating them from each other, adding more detail and maybe starting on lighting effects but thats for next time.


Thursday

This week I'm refreshing the Lightsworn mat. Tune in every day to see how its going.


Thursday and I'm working my way around the image increasing the detail and fixing problems as I find them. Problems like the area inside the red circle in the lower right image where we have a number of monsters overlapping.

If you go back to a previous image you will see that the arm is behind the hat and the nose of the dragon intersects the arm. Neither of which is right since the dragon doesn't even need to overlap anything and the character wearing the hat is meant to be behind everyone else.
The dragon is an easy fix just shorten his snout and fill the space with the background colour but while I've moved the hat in behind by redrawing the arm slightly i have noticed while writing this post that it could still do with some slight adjustments to make it look a bit less like its connected to the yellow line next to it.

Its been the same sort of work across the whole mat, erasing or moving lines, sometimes just a nudge, others more extensive changes to fix the little things that I didn't see or wouldn't even have considered the first time around and we will see more messing with little details tomorrow, especially the faces..
The other major job before writing this post was to work on the edges of characters. If there was a light edge then I would make sure it was as light as it could be and that the area next to it on any object behind it was in shadow. Similarly if you have a dark edge then the area in the figure next to it will most likely be lighter. Doing this we start to move away for relying on the black outlines to define edges insted we are tying to use how light works.

I also noticed that the background was missing something. There are areas around the edges that felt a bit empty so I started adding in more green blobs. Since the blobs glow that led to bringing up the brightness of the lighting effects something i was going to have to get around to at some point anyway.

Tomorrow sees the final post and there's still quite a bit to be done, we will just have to wait see how it all turns out.


Friday

So this week I set about refreshing the Lightsworn mat. I thought it would be interesting to show the progression from the original image on Monday to the final changed piece today so lets see where we got to in terms of the goals I set out on Monday


Goal A :Push the background back: Well its much darker now and a great deal more even across the whole mat both of which help prevent it from drawing your eyes away from the focus of the image which is the characters.

Still it's nice I didn't lose the detail entirely I had thought I might have to overwrite the whole thing with black or something just to get rid of it but in the end I dulled it down just enough to stop it being so dominant and that was enough.

B: To remove as many tangents a possible: This was the most time consuming part of the process luckily I could combine it with goal C to move things around and increase the detail at the same time. There may have been a magnifying glass involved in this process just saying.
I think I managed to get most of them, all the glaringly obvious ones at least, some things I just couldn't alter because of how the image was initially drawn. If I was to draw it now I might take negative space into more consideration.

C: Generally increase the level of detail: Using light and shadow to show edges really allowed me to get more detail into charters that are quite small. Hair and faces have seen a big jump in detail for some of the figures not to mention all the gold banding has much more depth now..
Then there were things like Lumina getting a face lift because i was working on the image upside down and didn't really feel her original head was quite the right shape, her skirt got extensions for the same reason. Neither task was especially straightforward, funnily enough its much easier to add colour and lines than remove them.

Final Verdict: I achieved all that I set out to do mostly to the degree of success i was hopping for and in terms of all the extra detail possibly more so, I'm not sure these is where i though I would end up but the journey is part of the fun.

The final oal I set myself was to write a post everyday for one week, some of yu may have noticed however that the first three days posts were all written at once that's because while I wanted to have a post a day, the actual refresh didn't take a week sometimes you have to bend spacetime for a good story. Perhaps next time I'll live steam the process or something?

Next week, that's no moon, well it was until i refreshed it.


16 July 2015

Refreshing a Custom playmat : Inzektors


This mat might look familiar. Way back in the mists of time or 2012 to be exact I created this mat but it looked somewhat different. Today I'm going to look at the Inzektor mat and how it eneded up getting a shiny new look.

The original post for this mat along with a making of video can be found HERE.


There are a number of my mats that over the years for one reason or another I've ended up hanging on to. Mostly I've been using them as test subjects and while I'm pleased they have maintained their condition all this time occasionally I'll walk past them and wonder if I should be doing more with them. Well the other week I walked past and thought since they are test subjects why not have a go at seeing if it was possible to remake them in some fashion, to answer questions like how easy would it be to update a mat? What areas would be the most difficult to change?

For this first test I decided to keep it simple. Update the characters in a way more in line with my current style and change any areas I wasn't completely happy with the first time around. For these reasons I chose the Inzector mat since it's a relatively straightforward design with a number of areas I would quite like to improve. It's also the oldest in the group and didn't have the protective layer later mats have gotten so it should be easier to alter.

...

The first thing to do is clean the mat. It's been hanging in a high pedestrian traffic area for 3 years so I assume its probably picked up at least some dust. In the end I find its held up very well, the colours haven't faded, the pegs holding it to the hanger haven't caused any permanent depressions (in fact I don't even have to iron it) and when I start cleaning it I find there is very little dust buildup. I did come away from the process thinking that perhaps in the future I could improve things further by putting them in clear plastic bags and connecting the haners to that.

If your going to clean one of these early mats I advise getting a soft damp cloth and just giving them a light wipe over then letting them dry naturally, they shouldnt be to bothered by water but heavy rubbing may damage them.

 ...

Mat cleaned we can start on the refresh proper. The first thing I do in this instance is build a new lighting scheme. In the original there is left, right, and central lights but there's a bit of a lack of consistency on my part which makes reading that quite tricky so I'm going to cut the central one and rework where many of the shadows and highlights are to make things more ovious and the shading sharper. 

With a better Idea of where the light is coming from I can change from flat shaded with black outlines to a more realistic shading scheme where edges are defined by areas of light and darkness. Changing from one to the other does however throw up the first problem, the black lines are rather stubborn and in some cases almost imposible to get rid of fully we will see later how this also afects the design choices for the background.

One of the interesting things I discovered while working on this project was watching areas increase in detail. It was as if their clothes went from old school Standard Definition where creases were sort of implied but not really to modern High Definition where you could have seen the stitches, well if I drew them in I didn't go quite that far. I guess its a similar phenomenon to how the sketches go though phases of level of detail increases before becoming the final design, but you know, three to four years apart.

...

The next thing I wanted to do was get rid of the weapons in the background, no one uses those cards and they pull focus away from the characters. The thing was there's quite a lot of line work going on in them and I would rather not have to do the entire background black just to obliterate them.

Some experimentation later I found I could overwrite them with certain dark colours and then take the background back to light colours by applying them in vast quantity's over the top of the new dark patches. the downside is that It uses a lot of resources I was just going to have to get creative and think up some other solutions.

In the end I decided since I quite like the hex pattern in the background perhaps I could make more of that. We need to lose the oranges and yellows in the background anyway since we want to avoid using colours that are on the characters as much as possible so if we make the hex's smaller we can use a bunch of blues and greens and any really stubborn lines can be hidden in darker hexes.

I'm still left with some lines that don't stay in their hex's though so the circuit pattern from the original scheme comes back to do double duty, add some depth to the background and change peoples perception of what they are looking at.

No those arnt lines from a previous design they are circuits. Sometimes it beter to change somethings meaning rather than the thing itself.

...

In terms of use of colour in the background other than the dark hex's to cover things most are random except for the teal hex's at the top and bottom which are very much placed deliberately to squish the other hex's further back near the center of the image to create a feeling like they are in a round room with really odd wallpaper.

I also get to finally make it seem like they are standing on something rather than floating in the air which is not only a  big plus but gets rid of an aspect of the original that had been bugging me for a while.

...

I'm definitely much happier with the final peice after its facelift than I was before I think its a definite step in the right direction. With what I have lernt from this experiment I can start upgrading other mats confident that it is possible, although it does make me wonder if I still have the mat in another 3 years what will I think of it then?

Hopefully I can look back and think there's so much that can still be improved. Because we should always be striving to improve our skills and learn new things.

Until next time. recolour the past.